OpenEBS cStor walkthrough
After creating the cStor disk pool, our logical next step is to create a storage class which uses this specific disk pool.
kind: StorageClass
apiVersion: storage.k8s.io/v1
metadata:
  name: cstor-csi-disk
provisioner: cstor.csi.openebs.io
allowVolumeExpansion: true
parameters:
  cas-type: cstor
  cstorPoolCluster: cstor-disk-pool
  replicaCount: "3"
We just created a storage class for cStor, which leverages the cstor-disk-pool we created, with a replica count of 3.
Putting the cStor storage class to use #
To illustrate other concepts like volume snapshotting and volume cloning, we shall deploy a MySQL database in our cluster. We will use the Bitnami MySQL chart for this. Here’s how the helm values will look like:
global:
  storageClass: cstor-csi-disk
auth:
  rootPassword: "root123"
primary:
  persistence:
    size: "4Gi"
Let’s deploy the chart in the default namespace.
$ helm repo add bitnami https://charts.bitnami.com/bitnami
$ helm repo update
$ helm install my-db bitnami/mysql --values mysql-values.yml
We can observe that after a minute or so, the following artefacts get created:
- A MySQL statefulset/pod
- A corresponding PVC
- A cStor storage controller in
openebsnamespace with 3 replicas
Now, we will login to the MySQL pod and add some data.
$ kubectl exec -it my-db-mysql-0 -- bash
# inside the pod
I have no name!@my-db-mysql-0:/$ mysql -u root -p"$MYSQL_ROOT_PASSWORD" -D my_database
Run these queries which will create an employees table and add 10 rows. I got this sample data from
Mockaroo.
create table employees (
	id INT,
	first_name VARCHAR(50),
	last_name VARCHAR(50),
	department VARCHAR(50),
	gender VARCHAR(50)
);
insert into employees (id, first_name, last_name, department, gender) values (1, 'Blair', 'Nowick', 'Accounting', 'Female');
insert into employees (id, first_name, last_name, department, gender) values (2, 'Ralf', 'MacKenney', 'Sales', 'Male');
insert into employees (id, first_name, last_name, department, gender) values (3, 'Kordula', 'Haggath', 'Training', 'Female');
insert into employees (id, first_name, last_name, department, gender) values (4, 'Nancey', 'Lamburn', 'Research and Development', 'Female');
insert into employees (id, first_name, last_name, department, gender) values (5, 'Christoffer', 'Danielut', 'Engineering', 'Male');
insert into employees (id, first_name, last_name, department, gender) values (6, 'Wynn', 'Gable', 'Product Management', 'Female');
insert into employees (id, first_name, last_name, department, gender) values (7, 'Evaleen', 'Ahren', 'Accounting', 'Female');
insert into employees (id, first_name, last_name, department, gender) values (8, 'Farrah', 'Haggart', 'Engineering', 'Female');
insert into employees (id, first_name, last_name, department, gender) values (9, 'Moshe', 'McCarter', 'Sales', 'Genderqueer');
insert into employees (id, first_name, last_name, department, gender) values (10, 'Ferd', 'Boulsher', 'Research and Development', 'Male');
Snapshotting volumes #
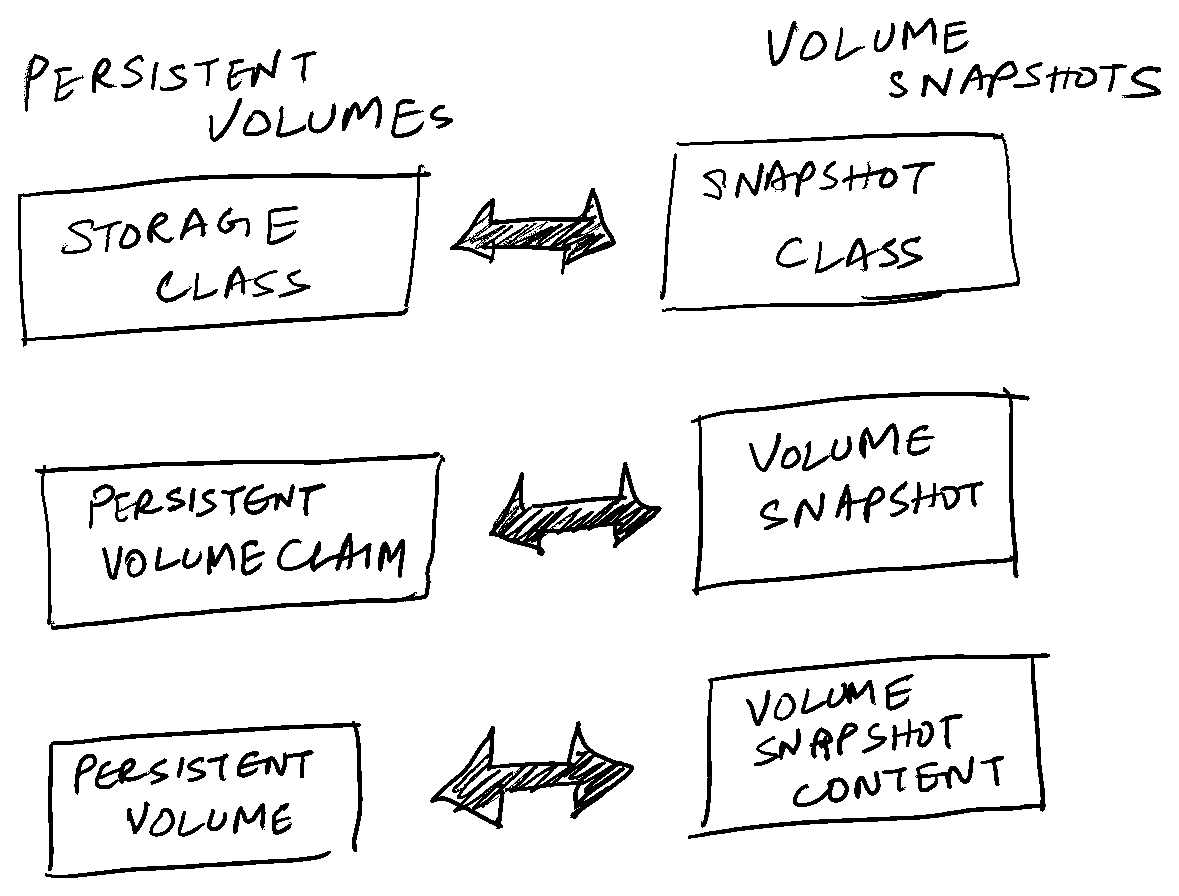
After adding 10 rows, let’s take a snapshot of the current volume. I’ll have to mention that the volume snapshotting is a general Kubernetes feature and not specific to any storage class or provider. Most providers support this since 1.20. We will scope this article to cStor. Similar to how there is a storage class, Persistent volume claim and Persistent volume, volume snapshot also has equivalent API resources. This is best represented by an image.

A VolumeSnapshotClass describes the storage policy, storage driver used etc. for any volume snapshot which gets provisioned through this snapshot class.
kind: VolumeSnapshotClass
apiVersion: snapshot.storage.k8s.io/v1
metadata:
  name: csi-cstor-snapshotclass
  annotations:
    snapshot.storage.kubernetes.io/is-default-class: "true"
driver: cstor.csi.openebs.io
deletionPolicy: Delete
Now, we create a VolumeSnapshot using this snapshot class. Here, we specify what PVC we have to snapshot.
apiVersion: snapshot.storage.k8s.io/v1
kind: VolumeSnapshot
metadata:
  name: data-my-db-mysql-0-snapshot
spec:
  volumeSnapshotClassName: csi-cstor-snapshotclass
  source:
    persistentVolumeClaimName: data-my-db-mysql-0
When we apply this, we will see 2 artefacts getting created.
- A volume snapshot.
- A volume snapshot content.
$ kubectl get volumesnapshot
NAME                          READYTOUSE   SOURCEPVC            SOURCESNAPSHOTCONTENT   RESTORESIZE   SNAPSHOTCLASS             SNAPSHOTCONTENT                                    CREATIONTIME   AGE
data-my-db-mysql-0-snapshot   true         data-my-db-mysql-0                           0             csi-cstor-snapshotclass   snapcontent-ec920b9c-d73f-484b-88e9-53ee6374830d   12h            12h

$ kubectl get volumesnapshotcontent
NAME                                               READYTOUSE   RESTORESIZE   DELETIONPOLICY   DRIVER                 VOLUMESNAPSHOTCLASS       VOLUMESNAPSHOT                AGE
snapcontent-ec920b9c-d73f-484b-88e9-53ee6374830d   true         0             Delete           cstor.csi.openebs.io   csi-cstor-snapshotclass   data-my-db-mysql-0-snapshot   12h
Cloning a volume snapshot #
The snapshot contains “point-in-time” copy of the volume we snapshotted. This means that any data added to the volume after taking a snapshot won’t get persisted in the snapshot. To demonstrate this fact, let’s get into the pod, login to MySQL prompt and add 2 more rows.
insert into employees (id, first_name, last_name, department, gender) values (11, 'Kelvin', 'Kohnen', 'Legal', 'Male');
insert into employees (id, first_name, last_name, department, gender) values (12, 'Millie', 'Kingswood', 'Research and Development', 'Female');
Now, the employees table contains 12 rows.
We will create a new PVC out of this snapshot.
| |
Notice the dataSource part highlighted. It indicates that we create this PVC out of a volume snapshot.
After this PVC is created, we will now deploy a new MySQL installation which utilizes this PVC.
$ helm install my-db-clone bitnami/mysql --values mysql-values-from-clone.yml
Here’s the helm values file referenced above.
global:
  storageClass: cstor-csi-disk
auth:
  rootPassword: "root123"
primary:
  persistence:
    existingClaim: "restore-mysql-pvc"
Now, when we login to the newly created MySQL installation which references the cloned PVC,
kubectl exec -it my-db-clone-mysql-0 -- bash
We notice that it contains 10 employees.
$ kubectl exec -it my-db-clone-mysql-0 -- bash
I have no name!@my-db-clone-mysql-0:/$ mysql -u root -p"$MYSQL_ROOT_PASSWORD" -D my_database
mysql: [Warning] Using a password on the command line interface can be insecure.
Reading table information for completion of table and column names
You can turn off this feature to get a quicker startup with -A

Welcome to the MySQL monitor.  Commands end with ; or \g.
Your MySQL connection id is 9241
Server version: 8.0.31 Source distribution

Copyright (c) 2000, 2022, Oracle and/or its affiliates.

Oracle is a registered trademark of Oracle Corporation and/or its
affiliates. Other names may be trademarks of their respective
owners.

Type 'help;' or '\h' for help. Type '\c' to clear the current input statement.

mysql> select count(*) from employees;
+----------+
| count(*) |
+----------+
|       10 |
+----------+
1 row in set (0.00 sec)

mysql>
This need not be done manually and can be scheduled as a backup and restore process, as we will see in the next post.